
(Versione in italiano)
Since several friends have really appreciatedmy pictures, I thought “why not sharing with others my little knowledge?”. And here’s a new category dedicated to this.
Today I am going to try to explain how to enhance your photos with what I believe to be one of the 5 best basic Iphone and Ipad apps:
Snapseed
 I am going to show you two different exemples, so that I can use mostly all the Snapseed menu options. This is the first photo:
Before and after:

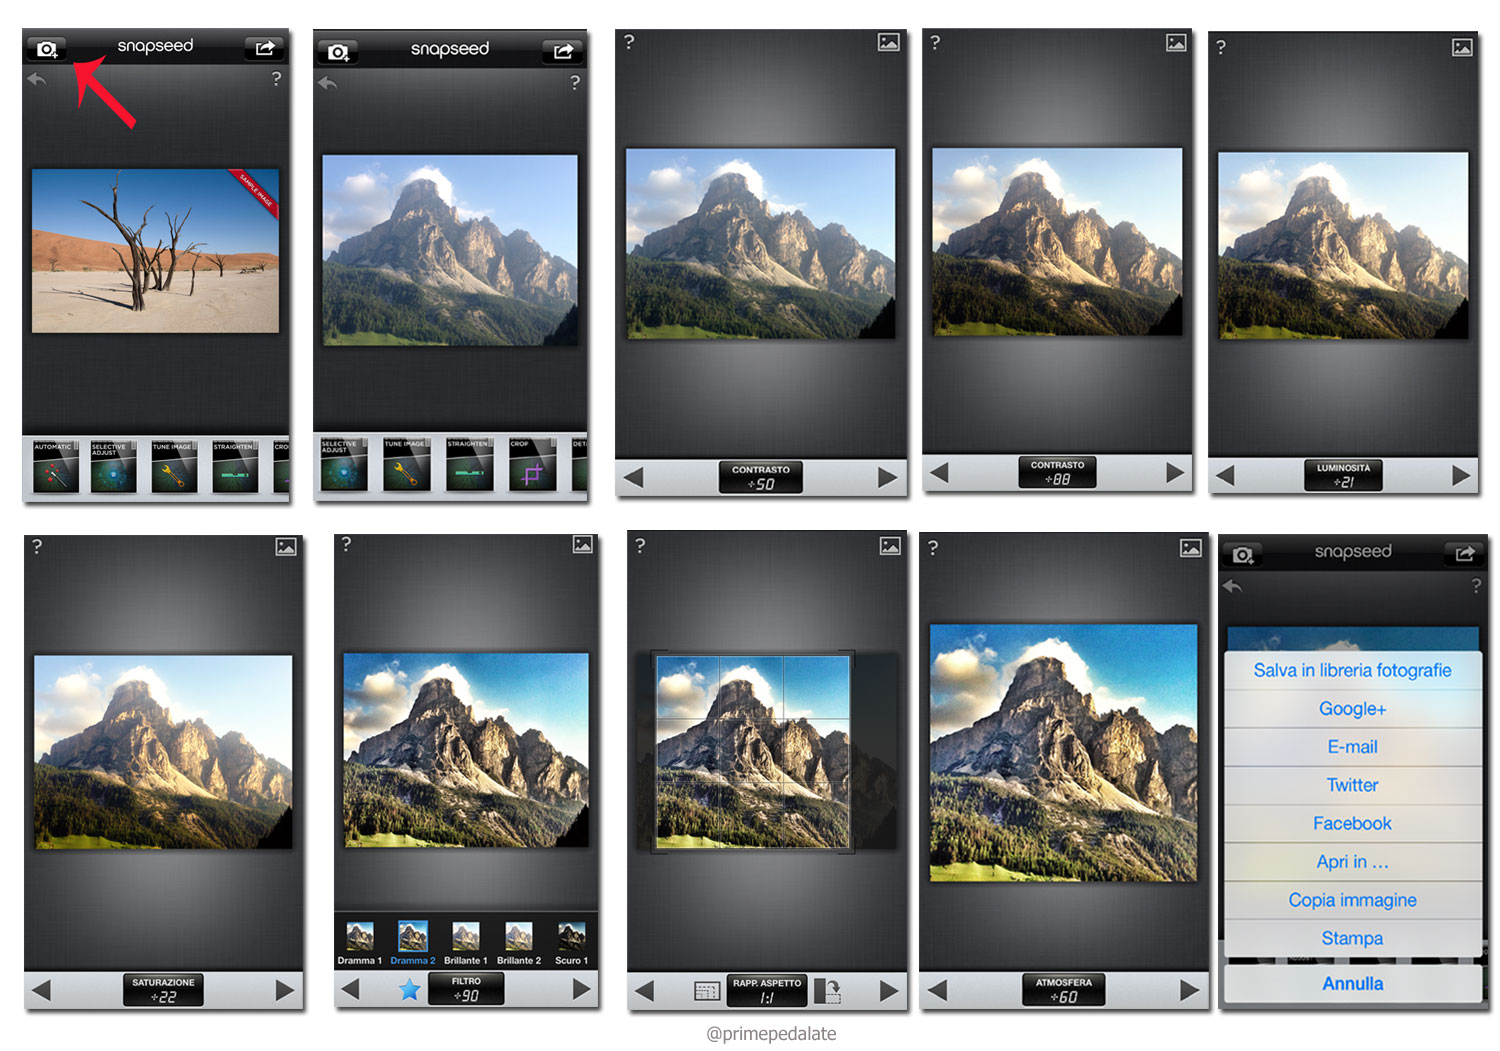
Open Snapseed and select a picture from the photos in your device.

I am going to use a picture I took last June of a wonderful mountain of the Dolomites, in Corvara, Italy. And I open it with Snapseed.

(Remember that you can always tap on the question mark at the top-right hand ride of the screen which helps you using the tools – in the example below the instructions are in Italian, as, of course, I am using it in Italian, but on your device you’ll have it in your own language) 
I usually use diffenrent tools for every picture, depending on the result I would like to achive. In this case, The fist thing I do with this is selecting the Snapseed Auto Correct feature, so I tap AUTOMATIC:
 Select CONTRAST, which by default is level 50. Confirm tapping the Apply arrown at the bottom on the right.
And the photo becomes like this:

I am not satisfied with the result, so I select AUTOMATIC and then CONTRAST again and I you use my finger to swipe from left to right until 88.

Now I select:TUNE IMAGE
 I tap the screen and hold my finger on the photo and swipe it down: It lets you adjust brightness, contrast, ambiance, saturation and white balance. I select brightness and corfirm my choise with the arrow. And the photo becomes like this:
 I would like now to have brighter colours, so I tap again on TUNE IMAGE and set SATURATION at 22.
 Now if I want to underline the details of my pictures, I select the DRAMA filter, I tap on DRAMA 2 at 80 and then I confirm my choice.

Now I am satisfied with my result, but I would like to post my picture on Instagram, so I need it to be square. So I select CROP and I choose the square cropping.
 Not yet 100% happy with the result, I once again tap TUNE IMAGE, and select AMBIENCE at 60.
 Now I save my picture.
 step by step:
 before and after
Second picture, taken yesterday in my town center. i am going to use different filters to achieve a different result.
 before and after
I open the image:
 As the picture isn’t straight, I select STRAIGHTEN and tap on it choosing the right angle.

 Then I use the BLACK AND WHITE
option:

 And I confirm my choice with the arrow at the bottom right.
Then I select BLACK AND WHITE but I tap on the “yellow” button.
 Now I would like to underline the depth of field, so I select CENTER FOCUS
then the star on the left and I select the BLUR effect at 66.

 I would like it to have a deeper effect, so I select TILT-SHIFT,
 I select the star and the oval focus, so that I can adjust the height and width of the area of focus, which is my case is the facade of the old building. I tap and drag to position the center of the area and among (transition, blur Strenght, brightness, saturation and contrast) I select Blur Strength At 85.
 I am happy with the result and I save the picture to my photo gallery.
 Final result:
 Step by step:
 before and after:
Snapseed is a very useful app, one of the easiest to use and most complete, but it has its limitations, like, for instance, these ones:
First of all if you made a mistake you cannot undo, the only choice you have is to revert to the unedited version, which sometimes is a nightmare!
When you select the Drama filter there isn’t any noise reduction or sharpening adjustments. For this reason if I want a HDR effect I prefer to use Camera Plus.
PS: if you use your IPAD instead of your Iphone, and you rotate the iPad, you get a larger view of the picture you’re working on.
I hope you enjoyed your reading.
